Thursday, January 20, 2011

Extra Virgin Olive Oil Hot Oil Treatment With Garlic

Where do I start...I was researching a hot oil treatment on YouTube when I found a very informative video by Nunaavane (Love her channel) anyways, she uses EVOO that is infused with garlic. The Garlic is for those who needs a little help with shedding. I don't have a problem with shedding, however, I fear that being my next issue...So I add garlic to my hairs regimen every now and then just to make sure all is good up there :-)
Okay, lets skip to the chase...Hot oil treatment is said to condition severely dry, damaged hair helping to treat breakage. There are many types of oils that will work with your hair...For example:
EVOO
is great as it penetrates the hair and scalp, taming frizz, and adding moisture.
Virgin Coconut Oil
is great for those with dry, itchy scalps, adding moisture as it penetrates the hairs shaft while trapping in proteins adding softness.
Grape seed Oil is the lightest of the 3 (perfect for relaxed or fine hair) This oil doesn't penetrate the hair, however, it does adsorb into the hairs shaft the fastest leaving little buildup/not weighing down your hair adding moisture and shine. All 3 oils stimulates the scalp helping with blood flow which wakes up sleeping follicles and provides healthy growth.

This what I do:
I first create my Garlic Tea Bag using minced or chopped fresh garlic. You can use garlic gloves or powder, but I have never done it that way. I cut open the top of a tea bag and empty out the contents. I then add in a Teaspoon of my minced garlic. After that, I staple the top of my teabag shut so none of the garlic escapes and gets into my hair.
Now I prepare my Hot Oil Treatment. I use EVOO. (How much to use depends on the thickness of your hair) I use about 1/3 cup of EVOO or about 2/3 cup for 2 applications. Also you can use an essential oil to camouflage the stench (YES! You will reek of garlic) So about 12 drops of whatever essential oil that smells nice to you. I use Clove Oil. I then microwave my oil mix for about 2 minutes or until it reaches a desired temperature. DO NOT OVER HEAT!!! Next I drop in my garlic tea bag and allow it to infuse my oils! (Smells like an Italian restaurant at this point!) I like it to sit in the oils for about 5 minutes.
I usually heat up my oils once again to my desired temp. I then section the hair and start at the nape area and apply the treatment using a color/perm applicator brush. You may have more left over. I like to use enough to coat and condition my entire head, but not too much where its running down my face and neck.
Once that is applied, either take a plastic bag, shower cap or Saran plastic wrap to wrap or cover your hair. You may need 2 bags! I use Saran wrap so I can trap in heat better. I then use an extra shower cap just in case the oils want to try to escape! To assure you are getting the maximum benefits of your treatment, wrap your hair in another scarf or bonnet for a few hours/while you sleep or sit underneath a dryer for 15-20 minutes. After you had enough of the foul smelling, greasy, hot treatment, rinse your hair AVOIDING sulfate shampoo. Sulfate shampoo will defeat the purpose of your treatment because it will strip your hair of oils...I use a Sulfate Free Shampoo, Miss Jessie's Creme De La Creme.
I C0-Wash my hair using Miss Jessie's Creme De La Curl. I also like to deep condition my hair using a protein base or moisture conditioner. (This is what I need for my hair! If your hair doesn't need it, DO NOT DO IT!!!) I use ORS Hair Mayonnaise Or Miss Jessie's Rapid Recovery. This really strengthens my hair and makes it soft. This is the way my hair looks after the treatment without blowing it out...Look at all the shine! My hair was extremely manageable and soft. Combing my hair was such a breeze!!!
This is my hair after I blow dried it on cool with no heat. The only product in my hair at this point is a leave-in by Jane Carter Solutions which I sprayed on before blow drying. Look how full it looks! It was so soft and thick. The texture was improved as well. Check out the back...
I really recommend doing this treatment at least once a month. If your hair can do without the garlic, skip it! The 3 benefits I got from this treatment was, softness, shine, and manageability. I also experienced more body and fullness and movement, however, that might have been from the deep conditioner.
So far, my hair has experienced little to no shedding thanks to the garlic dosage. I am satisfied with my results and I will be adding this into my regimen! I'm on my 8th month relaxer stretch/transitional phase. I am stretching to mid May to make my stretch an even 1 year or I will be big chopping and going natural at that point. Whatever I choose to do is whats best for my hair!

Sunday, January 2, 2011

MilkyWay Indian Loose Deep Wet & Wavy Weaving Hair


This hair was sent to me from Mimibeautyline.com I received this hair in a color #2. The hair I used is 12 and 14" in length of loose deep curls, made into a quick weave wig. I began wearing this hair early January, and with non continuous wear, this hair lasted me about 1 month with great hair care. If you are someone who plan on having this hair installed, you could get more uses out of this hair if you take precautions on what you put into this hair. Only put water onto it!

PROS: Very soft, can be straightened, and will return back to its wavy style with water, true to color, durable

CONS: Didn't last me a long time, sheds, became stiff after a few washes, tangles and mattes.

Rating:4 


Thursday, December 23, 2010

Outre Peaches Lace Front Wig


I purchased this wig from Mimi Beauty Supply Plus (An Ebay Store)
I received this wig in the color #2. This unit is about 20-22" long, loose body curls (Kim Kardashian like) style around 1/2"-1" of parting space.
I began wearing this wig early January 2011. With non continuous wear and great wig care, this wig may last you around 1 month. If you are someone who wears your wig continuously, this wig may last you about 2-3 weeks with great wig care.

PROS: Very soft, nice style, decent length, true to color, minimal amount of shedding, very full, great value.

CONS: Gets frizzy, tangles, cap size a bit loose, mattes at nape area, not a lot of lace or parting space, lace itchy, curls will drop.

Rating: 8.5


Wednesday, December 22, 2010

My Prior Preparation For Hair Relaxer Day

Now normally I stretch my relaxer for up to 17 weeks, or until I cannot stretch any more. But because my birthday and new years day are just around the corner, and I do not plan on wearing a full protective style, I will be relaxing my new growth. My last relaxer was in late September. So as of today (12/22) I am 13 weeks post, which is still pretty good in my opinion! In this post, I will be listing what I do to prepare my hair for a relaxer. Please note, the products specified are what works for me from experience!

First before any treatment services are applied to my hair, I shampoo my hair either using the ApHogee Shampoo for Damaged hair or a clarifying shampoo. This particular time I used a clarifying shampoo because I was out of the shampoo for damaged hair. I do 2 washes to assure myself that my hair is completely clean and free of any product buildup.


Then I do a protein treatment on my hair ONCE 7 days before relaxing. I use a mixture of ApHogee's 2 Step Protein Treatment and ApHogee's Treatment for Damaged Hair. Reading the instruction and ingredient content, I believe that these two products are very close in similarities. Both products are magnesium and modified protein infused which activates with heat into the hair follicles, making your hair extremely hard and reduces the possibility for breakage when combed or brushed for up to 6 weeks, even between washes and everyday manipulation. "I" mix the two products together because "I" noticed that I gotten better results other then using 1 or the other alone.


I apply the ApHogee 2 step protein treatment/ApHogee treatment for damaged hair generously to my hair, lightly comb it through for even distribution, then sit under a dryer until my hair is extremely hard. I then let it sit for 30 additional minuets to an hour before I rinse the product out. (NOTE: These products STINK!!)

Once all of the protein treatments are removed from my hair, I then use the ApHogee's Balancing Moisturizer. This product is crucial if you are doing treatment services. It helps correct and restore your hairs pH and moisture balance. High protein treatments can strip your hair of its moisture causing it to become hard and fragile to breakage. Using the balancing moisturizer helps seal in moisture which is essential for the strength and elasticity of healthy hair.


I apply the moisturizer to my hair, put on a plastic shower cap and allow it to penetrate my hair for an hour then thoroughly rinse out.

After that I then apply the Organic Root Stimulator Olive Oil Deep Conditioning Replenishing Pak to my hair, re apply my plastic shower cap/scarf, and allow that to sit in my hair over night. This process reassures me that I am getting the proper moisture nourishment I need to be confident that I wont be dry or endure any breakage.


Now finally, I rinse the conditioner out, allow my hair to air dry (I usually do this on my off days from work/school) then braid my hair into two sections. My hair will remain in the 2 braids with little to no manipulation, until relaxer day just to avoid any burning to my scalp. In the meanwhile, I wear my hair in protected style (wigs...) until then.

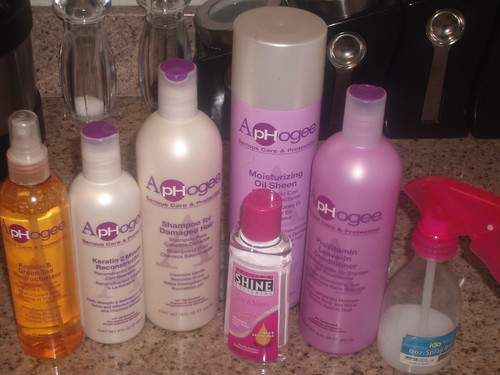
Products I use and will recommend...
ApHogee and  Smooth-n-Shine Products
Keratin green tea restructionizer
Keratin 2 minuet reconstruction
Shampoo for damaged hair
Moisturizing oil sheen
Pro-Vitamin Leave in conditioner (in spray bottle)
Smooth-n-Shine Silk-n-Sleek strengthener hair polish

**Products listed are what generally works for me from experience.**

Tuesday, December 14, 2010

It's A Wig Lace Front Bright


I purchased this wig from SamsBeauty.com. I have this wig in the color #2. It is about 16" long, loose curl.
I started wearing this wig in early January. Without continuous wear, this wig lasted about 2-3 weeks with great wig care. If you are someone who wear the same wig continuously, this wig may last about a 1-2 weeks with great wig care.

PROS: Good value, true to color, decent length, snug fit, very soft.

CONS: Very thin, curls very loose, some pieces of the hair didn't have a curl and was straight, 1/2" of parting space, lace was shiny, tracks were detectable, adjustable strap broke, lace very hard, frizzed up within one day of wear, no volume or body, tangled very much at the nape, hair shed.

Rating: 5

Saturday, December 11, 2010

Sensationnel HZ-T007 Lace Top Wig


I purchased this wig from samsbeauty.com. I received this wig in a color #2. This wig is about 14-16" of medium sized curls. I began wearing this wig mid December 2010. Since I have only wore this wig twice, it is still in "like new" condition. If you are someone who wears the same wig occasionally, this wig should last you about a month with great wig care.

PROS: Hair is very soft, lace top lays flat for a natural hairline appearance, great wig for the value, very minimal shedding.

CONS: Color runs darker (#2 looked more like a #1b), wig cap is very tight, front comb is too long, you must pull some of your own hair out for a natural appearance, curls easily tangle in back combs, curls are flat toward the top of the wig giving a "helmet" looking affect.

 Rating: 4


Me wearing the wig as a total half wig (more of my hair pulled out.) (Note: It was a bit difficult blending my hair in as I have a lot of new growth.)

Thursday, December 2, 2010

Louisiana Crunch Cake With Vanilla Almond Glaze


Cake:
3 c. cake flour
1 tsp. salt
1 tsp. baking powder
1/2 tsp. baking soda
2 c. granulated sugar
1 c. (2 sticks) butter...softened
1/4 c. sour cream
4 large eggs...room temp.
1 c. buttermilk
2 tsp. vanilla extract
1/4 c. white granulated sugar
1/4 c. sweetened coconut flakes

Directions:
Preheat oven to 350 degrees...Have a non stick tube cake pan ready.
In a medium bowl sift together cake flour, salt, baking powder and soda...Set aside.
Beat softened butter and sugar together until very fluffy (about 5 minuets). Mix in sour cream. Add eggs one at a time and beat until mixture becomes light and fluffy. Mix in vanilla extract.
Add in buttermilk and the cake flour mixture in alternates and beat until fully combined (see video for example)
PLEASE DO NOT OVER BEAT OTHERWISE CAKE IS GOING TO BECOME ROCK HARD!!!
Thoroughly grease a non stick tube pan! If your pan in not a non stick pan, you will need to grease and flour it.
Add approx 1/4 cup of granulated sugar to the pan, and tap around the sides and bottom until evenly coated. Sprinkle coconut flakes to the bottom of pan...You may add more or less coconut, its totally up to you. Pour in batter. Bake for 50 minuets to an hour, or until a wooden skewer inserted into cake comes out clean. DO NOT OVER BAKE!!!!! Otherwise cake will become dry. Once cake is finished baking, remove from pan and let cool.

Vanilla Almond Glaze:
2 c. powdered sugar
4 tbs. butter...melted
4 tbs. canned evaporated milk
1/2 tsp. vanilla extract
1/2 tsp. almond extract

Directions:
Whisk together powdered sugar butter and milk. Add vanilla extract and almond extract and mix. Add more milk for a thinner consistency.
Drizzle glaze over cake and let set for 10 minuets.
Serves about 8-10.